Visual Creation
February Art Ideas to Brighten Winter Days
Brighten the winter gloom with creative February art ideas. This comprehensive guide offers projects...
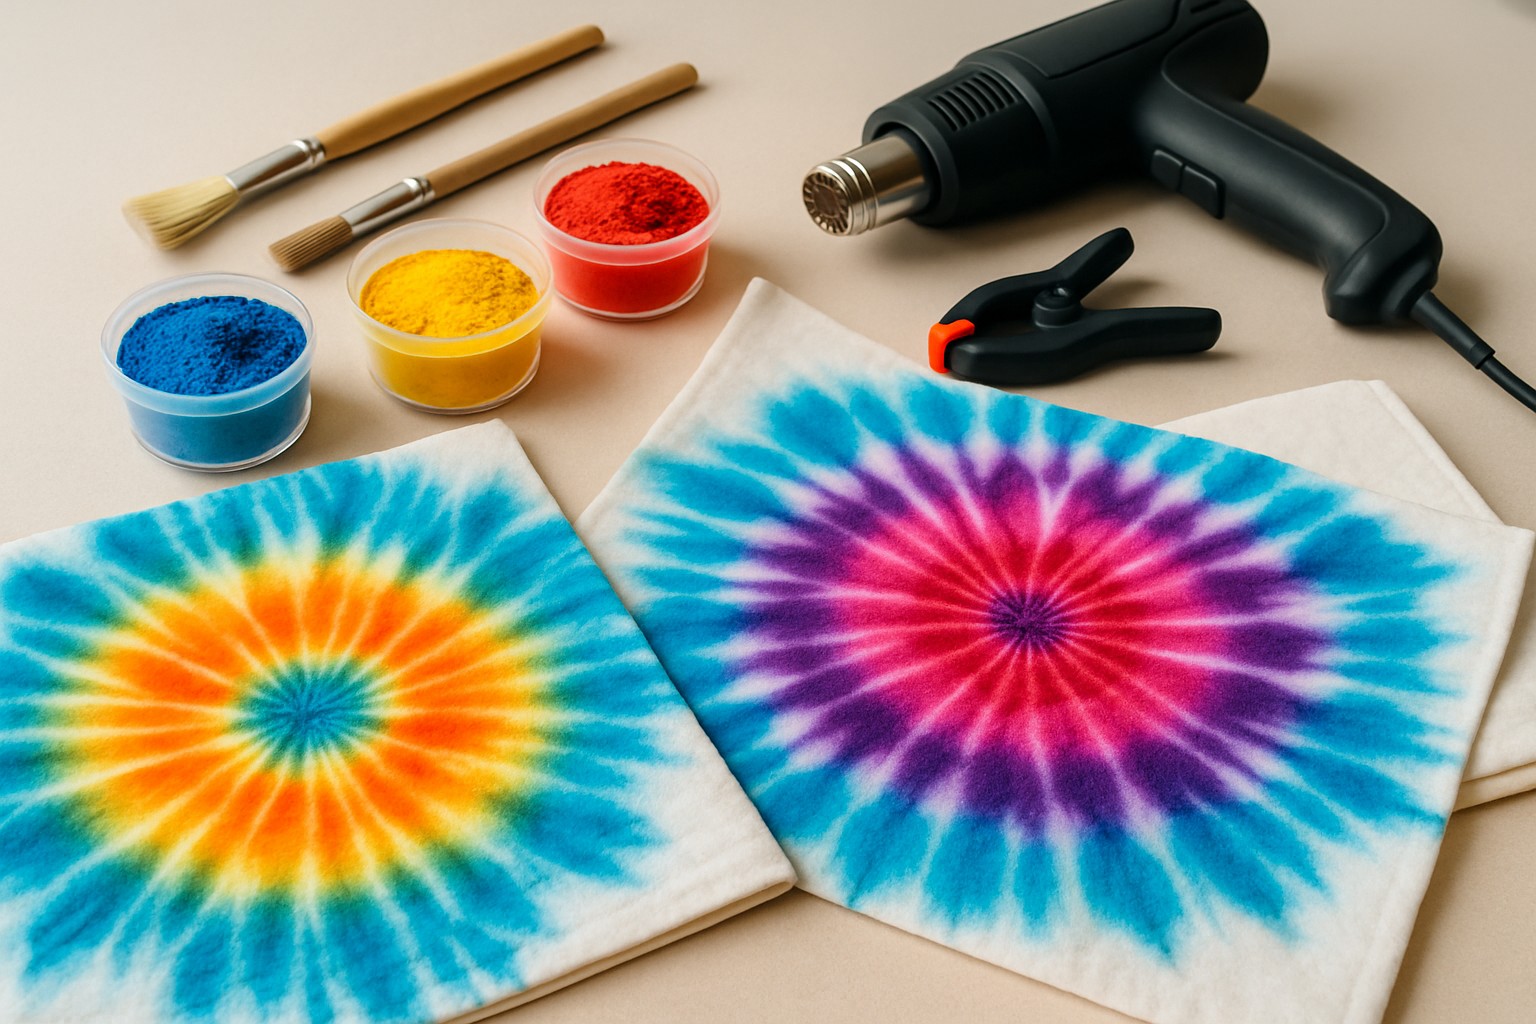
Dry tie dye puts a clever twist on the classic method by skipping the wetting step upfront. Rather than dunking the fabric in water, this dry tie dye technique uses powders or paints applied straight onto the cloth with a tiny splash of moisture to help bring out crisp patterns and intriguing textures.
Dry tie dye has a handful of clear perks. For starters, it’s way less messy because it uses little to no water. This is a blessing if you’re not keen on scrubbing dye splatters later. Plus, it dries faster so you can wrap up your project sooner and get on with your day. On top of that, it gives you better control over where the dye lands without wild spills or surprises.
To truly nail dry tie dye you will want to start with plain natural fabrics and powdered fiber reactive dyes with fixatives. Don’t forget a good pair of gloves to keep your hands safe, applicator brushes for precision, stencils if you are feeling fancy and something sturdy to shield your workspace from colorful chaos
| Material | Purpose | Alternatives | Tips for Selection and Preparation |
|---|---|---|---|
| 100% Cotton Fabric | The go-to for soaking up bright, vibrant colors like a sponge | Linen, rayon | Give it a good pre-wash to banish any sizing; steer clear of synthetic blends for best results |
| Powdered Reactive Dyes | Pack a punch with vivid, long-lasting colors without the hassle of soaking | Fabric paints in powder or dry form | Always pick dyes labeled specifically for fiber reactive use, and don’t skip the mixing instructions—they’re there for a reason |
| Soda Ash Fixative | The secret sauce that helps lock dye color firmly onto fabric | Washing soda | Depending on your style, either pre-soak or just give the fabric a light spritz—it’s all about what works best for you |
| Disposable Gloves | Your best friend for keeping hands spotless from stubborn stains | Reusable rubber gloves | Snug-fitting gloves give you way better control—trust me, it’s worth the extra comfort |
| Brushes and Applicators | Let you add dye powders with pinpoint precision | Stencils, sponge applicators | Fine brushes are perfect for those tiny details, while stencils come in handy for patterns you want to repeat again and again |
| Plastic Sheeting | The unsung hero that protects your work surface and captures those sneaky stray dyes | Old newspapers, tarp | Make sure to cover every inch of your workspace and tape down the edges—spills love to escape otherwise |
Getting your fabric ready is a surprisingly big deal for how well your dyes stick and how vibrant they look on the textile. Dry tie dye helps cut down on water use but it’s still smart to pre-wash the fabric to remove any chemicals or oils on the surface. Unlike the wet tie dye method, avoid pre-wetting here. Too much moisture can spread the powders and leave you with blurry or messy patterns that no one wants.
Five reliable dry tie dye techniques consistently deliver impressive results. These methods keep things simple and help you achieve bright crisp colors with hardly any mess.
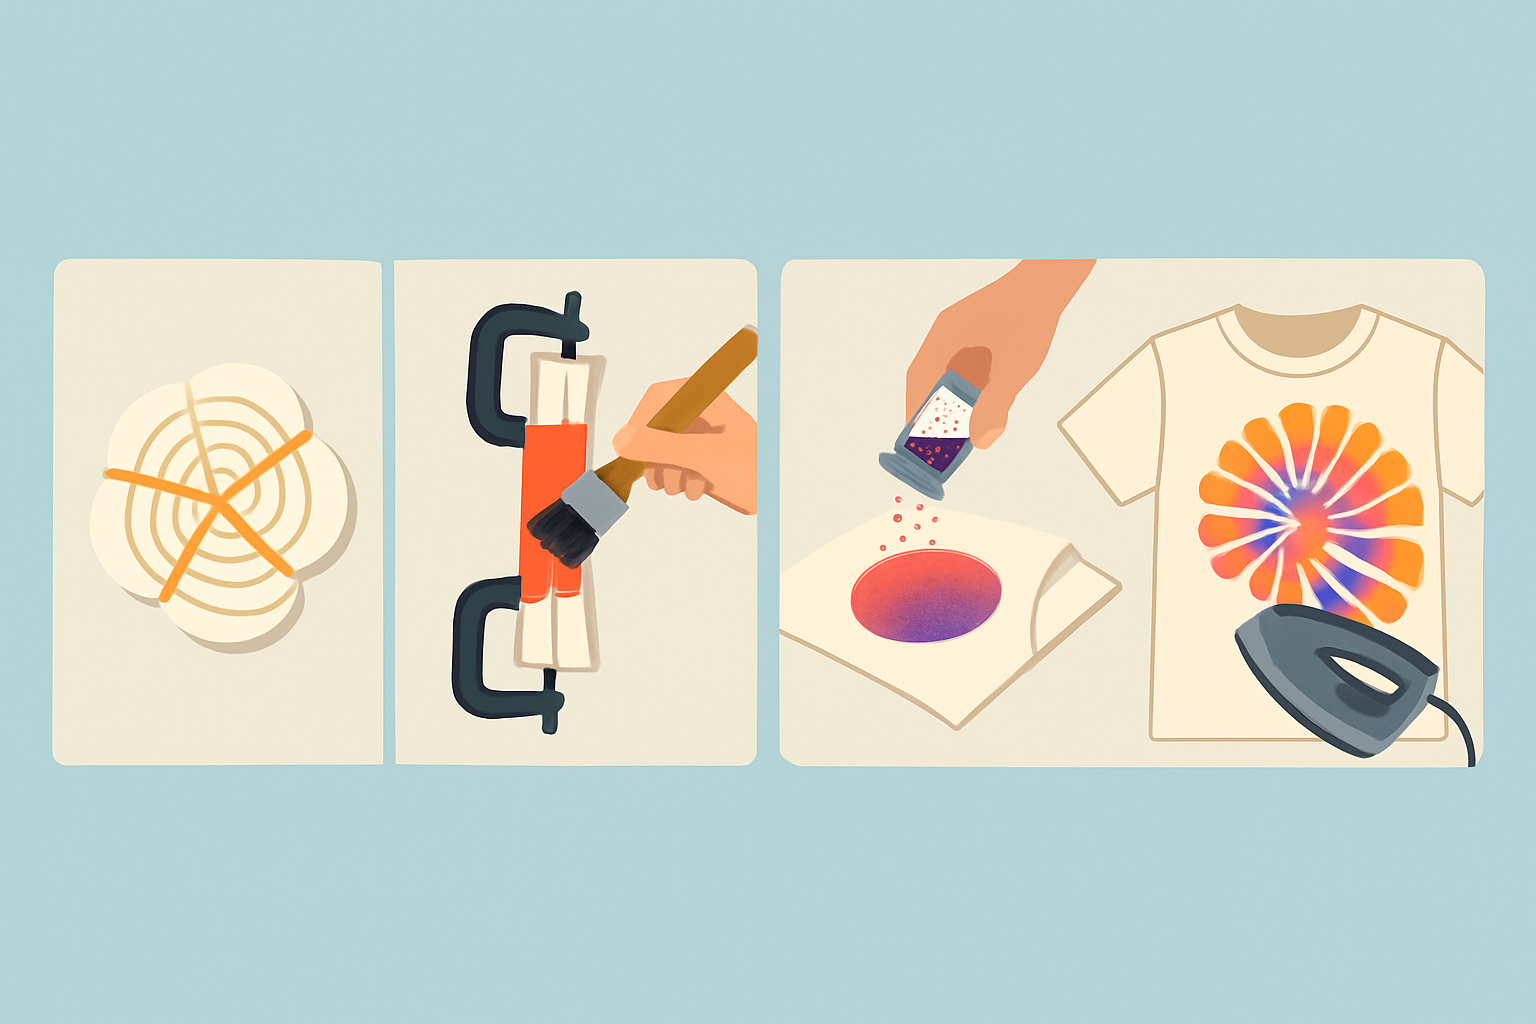
Visual guide illustrating the five dry tie dye techniques with fabric examples and application tools
Each technique really shines when you handle it with care. Apply powder lightly and evenly—think of it like sprinkling the right amount of sugar on your morning cereal to avoid clumps. Clamping should be firm enough to keep the fabric snug but gentle so you don’t stress those delicate fibers. Synthetic bristles usually do a smoother job of picking up powder which I’ve found saves a lot of fuss.
Once your dry tie dye design is all done and dusted, it’s key to lock in those vibrant colors so they really stick around. You can achieve this by heat setting with an iron or giving the fabric a quick spritz with a fixative spray to seal the dyes in place. When washing time rolls around, stick to cold water and a mild detergent to help keep those colors popping.
Dry tie dye tends to work really well for a variety of creative projects, whether you are crafting wearable art or adding a splash of personality to your home decor. If you're just dipping your toes in, dry tie dye scarves or tote bags make perfect canvases to practice simple patterns without feeling overwhelmed. People with a bit more experience often dive into pillow covers or decorative wall hangings, where they can truly flaunt their skills with detailed stencils or brush techniques.
Mastering dry tie dye opens up a space where careful technique blends with creativity, letting fabric artists craft striking, neat designs without the usual mess. Playing around with different approaches often uncovers unique color effects and patterns that can really make plain fabrics pop to life.

With experience in neuroscience journalism, Vesper makes cutting-edge brain research accessible to general audiences through clear explanations and compelling case studies.
Read ArticlesBrighten the winter gloom with creative February art ideas. This comprehensive guide offers projects...
Learn the best materials to embed in resin that won't fade or bubble, plus professional tips to keep...

Explore Reykjavik like a local with this complete guide to free and affordable activities. From icon...
Wondering if Belize City is worth visiting? Explore its rich history, vibrant culture, stunning natu...